
Braking: What Go-eth Must Also Stop-eth
There is nothing better than getting on the open road, especially a curvy road, and just enjoying the solitude and fun a motorcycle can bring you. When we get on our bikes, movement forward is practiced a lot, but how many times do we practice stopping that forward momentum so that we can be prepared for a quick stop?
You have to ask yourself a few basic questions:
There are many other scenarios that could also cause your heart to skip a beat or two. Always being vigilant and not being complacent, and making sure your “Rider’s Radar” is properly tuned in can help get you out of most situations, but accidents unfortunately occur, no matter how much you try to avoid them. Research over the years has found that braking mistakes are common in motorcycle accidents or crashes, especially in single vehicle crashes, which is caused by “rider error”. In many cases, had the motorcyclist had been able to stop properly, or even been able to slow down quickly to reduce their speed and inertia (remember Newton’s Laws?), would have had a big influence on avoiding an accident, or at least greatly reducing the impact of a collision.
It should be noted that there are 2 (two) terminologies at work here, Stopping Distance, and Braking Distance (which this article will discuss). So, let‘s look at what they are and a number of influencers that help determine each;
Stopping Distance: Depends on how fast you are riding, your health, time of day, whether you are going uphill, downhill or level, and whether you are impaired in any way, because this will effect your “thinking / reaction distance).
Braking Distance: Depends on condition of bikes tires, condition of the road, type of road surface, brake efficiency (single disc, dual disc, drum type, one or two brakes used), bike suspension set-up, load (heavier the bike + load=farther distance), and the riders own abilities.
You have to ask yourself a few basic questions:
- What is the shortest distance that I know I can stop if I had to, at each speed (threshold braking)?
- Am I nervous or anxious when I approach an intersection or a vehicle pulled over to the side of the road?
- Am I prepared for a vehicle pulling out in front of me?
- Have I ever made an error in my braking (wheel lock-up, skid front or back, too soon or too late on the brakes)?
- Will the vehicle in front of me all of a sudden hit the brakes without warning?
There are many other scenarios that could also cause your heart to skip a beat or two. Always being vigilant and not being complacent, and making sure your “Rider’s Radar” is properly tuned in can help get you out of most situations, but accidents unfortunately occur, no matter how much you try to avoid them. Research over the years has found that braking mistakes are common in motorcycle accidents or crashes, especially in single vehicle crashes, which is caused by “rider error”. In many cases, had the motorcyclist had been able to stop properly, or even been able to slow down quickly to reduce their speed and inertia (remember Newton’s Laws?), would have had a big influence on avoiding an accident, or at least greatly reducing the impact of a collision.
It should be noted that there are 2 (two) terminologies at work here, Stopping Distance, and Braking Distance (which this article will discuss). So, let‘s look at what they are and a number of influencers that help determine each;
Stopping Distance: Depends on how fast you are riding, your health, time of day, whether you are going uphill, downhill or level, and whether you are impaired in any way, because this will effect your “thinking / reaction distance).
Braking Distance: Depends on condition of bikes tires, condition of the road, type of road surface, brake efficiency (single disc, dual disc, drum type, one or two brakes used), bike suspension set-up, load (heavier the bike + load=farther distance), and the riders own abilities.
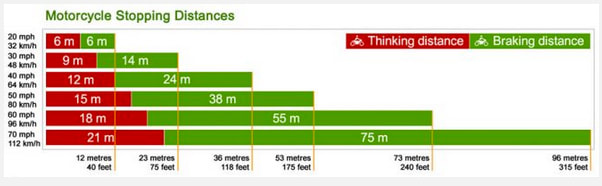
SOURCE: https://www.motorcycletesttips.uk/motorcycle-theory-test/motorcycle-stopping-distances/
As a Motorcycle Rider Coach / Trainer / Instructor (and basketball coach / referee for over 30 years), I tell my motorcycle students the analogy of offense versus defense: Offensively, getting on the bike is like a basketball player grabbing a ball and going for the hoop. Both are the fun and exciting things to do. On the Defensive end, which is not as much fun to do, is bringing your bike to a quick stop or a basketball player playing close man-to-man defense. Both require a good deal of thought, effort, and being aware of your surroundings, but given the choice, which does each want to practice? The offense, because it is more fun! We need to practice our defense as well, and as hard, to be a complete biker or player. All too often motorcycle crashes, injuries, and fatalities occur as a result of poor braking or braking errors, brought on by a lack of practice and poor braking skills. Yes, the road conditions and the condition of the brakes or ABS vs non-ABS can play a part as well, but for the sake of this article, we will concentrate on the human effect.
Let’s Look At A Number Of The Braking Errors People Tend To Make
On almost all bikes (with the exception of Peter Fonda’s bike, “Captain America”, from the movie Easy Rider) have two sets of brakes. Keep this in mind. As well, we will be discussing braking of non-ABS bikes, but a good deal of the techniques here fit ABS braking.
Error 1:
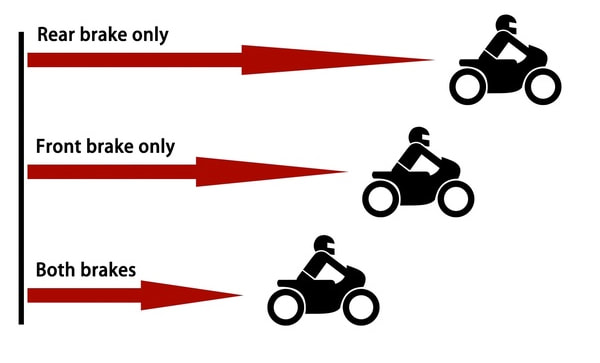
Using Rear Wheel Brake Only
(For the purposes of this write-up, we will concentrate on higher speed maneuvers as back brake only does have its place in slow speed maneuvers, such as a parking lot).
This is more common than you think. I see this too often when conducting experienced or Advanced Rider training. Riders only using one brake, and in a lot of cases, the back brake. Why? They were taught that way by someone who helped them get into riding, used to braking over an extended distance which means they start slowing down long before they have to, and on the road they become a source of frustration for vehicles following behind them, lack of experience (even though they may have been riding for years – riding from home to Tim Horton’s and back does not give you much in the way of experience), or they don’t feel comfortable when the front brake is used and causes the front to pitch somewhat.
Problems Associated With Back Braking Only
Error 2:
Using Front Brake Only
While the use of the front brake needs to be encouraged to those that only use the back brake, we need to understand the pros and cons of front brake only use. Approximately 78 – 80% (give or take given certain testing formulas) of a motorcycles braking power comes from proper use of the front brake. As a bike begins to stop, as already mentioned, the weight shifts forward, and this downward pressure on the front actually gives the front wheel more traction, while the rear gets less. The trick is to use the front brake is used properly (squeezed, not grabbed). As an analogy, picture a Styrofoam cup almost full of hot coffee, if you squeeze, you can bring the coffee to the top without spilling it on yourself (no skid) vs a hard grab on the cup and the coffee spills out on your hand (a lock-up skid)
Problems Associated With Front Brake Only
While the use of the front brake needs to be encouraged to those that only use the back brake, we need to understand the pros and cons of front brake only use.
1. Front Wheel Lock-Up (Skid) -The front brake does have a shorter, by far, stopping length than the rear brake, the most heart stopping type of skid is the front wheel skid. You now have no control of the bike what-so-ever! This usually happens in a panic situation or a “compromised” (wet, grit, etc.) road surface when the brake lever is grabbed, not squeezed gently. (see above). Results: an ugly crash where the wheel will slip out from under the bike because traction has been lost (remember, the weight is shifting forward and the forks, which are now compressed, will want to return to its normal state and in the process push the wheel out even more, increasing instability). Ouch, this is going to hurt, if… you don’t correct the problem in an instant, by releasing the brake lever, allowing the front wheel to spin again (yes, it will give a jerk as it tries to re-align its track), and then re-apply the brakes without locking up. It may sound simple, but if you have never tried it, muscle memory and experience will not work for you.
2. Front Wheel Lock-Up In A Curve – A good trick to help in a curve is applying just a little pressure on the front brake as you enter the curve in what is known as “trail braking”. Too much pressure (grabbing the lever) can result in the front wheel locking up and creating an uncontrollable skid, with the bike sliding out from underneath you. An added problem is through panic or “I think this will work” syndrome, you let go of the front brake to release the lock-up like you would on a straight lane, except that tire in front has just gained a whole lot of traction on the release, and depending on your lean angle, speed, bike type, and road surface, you could be going for a high side ride.
3. Front Wheel Lock-Up or Almost Lock-Up While Slow Maneuvers – Just had to include this, even though it is slow speed stuff. This can be one of the most embarrassing things for a motorcycle rider. You are riding slow in a parking lot (say, under 3-4 km/h, and you have the handle bars turned slightly with a slight lean of the bike, and now you apply front brake. All of a sudden, your bike pitches to the ground, and because it is heavy, and has momentum, you have to let it go. Newton’s Laws of gravity and inertia took over. This would have been the place to use your rear or “controlling “brake only (yes, there are places where 1 brake only works!)
While front brake only standards apply to moto-racing because of the nature of high speed turns with shifting weight from the body and the professional experience most of these riders have, it works for them, and most of their braking is done before the curve, using power to the back wheel to accelerate through under control.
Error 3:
Improper Use Of Both Brakes
The use of both brakes to bring a bike to a controlled stop is indeed the best way to do it. You are spreading the braking power to both wheels, even though the majority is on the front, by using both reduces forward pitch on the front forks and a more comfortable stop. This where you have to train yourself to use both brakes properly as you are using your hand and foot together, in harmony (for the lack of a better word).
1.Use Both Brakes, Soft on Front – Your stopping distance will surely be better but not as good as it would be if you applied more pressure to the front (fear of lock-up seems to always be there).
2. Use Both Brakes, Soft On Rear – As above, your stopping distance will be shorter, even shorter than being soft on front brake, but still could be better by applying both with enough pressure to get the maximum stopping power from both.
3. Hard Front Brake Before Rear Brake- stopping distance will be close to #2 above but having braked hard with front, moves weight forward, less on rear tire, and when you apply the rear brake, there may be little it can do and it will lock-up, becoming useless because there is little weight there to give it downward force.
As a Motorcycle Rider Coach / Trainer / Instructor (and basketball coach / referee for over 30 years), I tell my motorcycle students the analogy of offense versus defense: Offensively, getting on the bike is like a basketball player grabbing a ball and going for the hoop. Both are the fun and exciting things to do. On the Defensive end, which is not as much fun to do, is bringing your bike to a quick stop or a basketball player playing close man-to-man defense. Both require a good deal of thought, effort, and being aware of your surroundings, but given the choice, which does each want to practice? The offense, because it is more fun! We need to practice our defense as well, and as hard, to be a complete biker or player. All too often motorcycle crashes, injuries, and fatalities occur as a result of poor braking or braking errors, brought on by a lack of practice and poor braking skills. Yes, the road conditions and the condition of the brakes or ABS vs non-ABS can play a part as well, but for the sake of this article, we will concentrate on the human effect.
Let’s Look At A Number Of The Braking Errors People Tend To Make
On almost all bikes (with the exception of Peter Fonda’s bike, “Captain America”, from the movie Easy Rider) have two sets of brakes. Keep this in mind. As well, we will be discussing braking of non-ABS bikes, but a good deal of the techniques here fit ABS braking.
Error 1:
Using Rear Wheel Brake Only
(For the purposes of this write-up, we will concentrate on higher speed maneuvers as back brake only does have its place in slow speed maneuvers, such as a parking lot).
This is more common than you think. I see this too often when conducting experienced or Advanced Rider training. Riders only using one brake, and in a lot of cases, the back brake. Why? They were taught that way by someone who helped them get into riding, used to braking over an extended distance which means they start slowing down long before they have to, and on the road they become a source of frustration for vehicles following behind them, lack of experience (even though they may have been riding for years – riding from home to Tim Horton’s and back does not give you much in the way of experience), or they don’t feel comfortable when the front brake is used and causes the front to pitch somewhat.
Problems Associated With Back Braking Only
- Much Looooonger Stopping Distance – a back brake only gives you in the area of 18 – 20% of your overall stopping ability, and because the weight of bike and rider shifts forward during stopping, the rear wheel loses traction because of the reduced downward pressure.
- Wheel Lock-Up (Skidding) Part 1– because of the reduced downward pressure, the back brake becomes very susceptible to locking up. A locked-up or skidding wheel actually has less friction with the pavement, and therefore your stopping distance increase even more
- Wheel Lock-Up (Skidding) Part 2 – now that the wheel is locked, and if you where moving straight ahead when it did, you are now committed to going a straight-line path. You do not have the ability to make any turning corrections.
- Wheel Lock-Up (Skidding) Part 3 – if the rear wheel has slid sideways and you are no longer in a straight alignment, you have a good chance of having a “high-side” crash (getting tossed off the bike in direction of travel), caused by releasing the brake pedal because all of a sudden, in your panic, the rear wheel now has more friction, even though it is now turning, than it did, and stops abruptly as the bike tries to re-align itself.
- Wheel Lock-Up (Skidding) Part 4 – if the rear wheel continues to slide out from under the bike and does not slow down sufficiently, you could “low-side”, that is the bike slides out from underneath you and now you and bike are sliding along the road. Some call it “I had to lay ‘er down to stop”. Laying a bike down usually only stops when it hits something, and you hope you have good gear on that will say your skin. This action will even be more acute in a curve if you lock-up because inertia will have the wheel slide out and down goes you and bike, and this ride is not a pleasant one!
Error 2:
Using Front Brake Only
While the use of the front brake needs to be encouraged to those that only use the back brake, we need to understand the pros and cons of front brake only use. Approximately 78 – 80% (give or take given certain testing formulas) of a motorcycles braking power comes from proper use of the front brake. As a bike begins to stop, as already mentioned, the weight shifts forward, and this downward pressure on the front actually gives the front wheel more traction, while the rear gets less. The trick is to use the front brake is used properly (squeezed, not grabbed). As an analogy, picture a Styrofoam cup almost full of hot coffee, if you squeeze, you can bring the coffee to the top without spilling it on yourself (no skid) vs a hard grab on the cup and the coffee spills out on your hand (a lock-up skid)
Problems Associated With Front Brake Only
While the use of the front brake needs to be encouraged to those that only use the back brake, we need to understand the pros and cons of front brake only use.
1. Front Wheel Lock-Up (Skid) -The front brake does have a shorter, by far, stopping length than the rear brake, the most heart stopping type of skid is the front wheel skid. You now have no control of the bike what-so-ever! This usually happens in a panic situation or a “compromised” (wet, grit, etc.) road surface when the brake lever is grabbed, not squeezed gently. (see above). Results: an ugly crash where the wheel will slip out from under the bike because traction has been lost (remember, the weight is shifting forward and the forks, which are now compressed, will want to return to its normal state and in the process push the wheel out even more, increasing instability). Ouch, this is going to hurt, if… you don’t correct the problem in an instant, by releasing the brake lever, allowing the front wheel to spin again (yes, it will give a jerk as it tries to re-align its track), and then re-apply the brakes without locking up. It may sound simple, but if you have never tried it, muscle memory and experience will not work for you.
2. Front Wheel Lock-Up In A Curve – A good trick to help in a curve is applying just a little pressure on the front brake as you enter the curve in what is known as “trail braking”. Too much pressure (grabbing the lever) can result in the front wheel locking up and creating an uncontrollable skid, with the bike sliding out from underneath you. An added problem is through panic or “I think this will work” syndrome, you let go of the front brake to release the lock-up like you would on a straight lane, except that tire in front has just gained a whole lot of traction on the release, and depending on your lean angle, speed, bike type, and road surface, you could be going for a high side ride.
3. Front Wheel Lock-Up or Almost Lock-Up While Slow Maneuvers – Just had to include this, even though it is slow speed stuff. This can be one of the most embarrassing things for a motorcycle rider. You are riding slow in a parking lot (say, under 3-4 km/h, and you have the handle bars turned slightly with a slight lean of the bike, and now you apply front brake. All of a sudden, your bike pitches to the ground, and because it is heavy, and has momentum, you have to let it go. Newton’s Laws of gravity and inertia took over. This would have been the place to use your rear or “controlling “brake only (yes, there are places where 1 brake only works!)
While front brake only standards apply to moto-racing because of the nature of high speed turns with shifting weight from the body and the professional experience most of these riders have, it works for them, and most of their braking is done before the curve, using power to the back wheel to accelerate through under control.
Error 3:
Improper Use Of Both Brakes
The use of both brakes to bring a bike to a controlled stop is indeed the best way to do it. You are spreading the braking power to both wheels, even though the majority is on the front, by using both reduces forward pitch on the front forks and a more comfortable stop. This where you have to train yourself to use both brakes properly as you are using your hand and foot together, in harmony (for the lack of a better word).
1.Use Both Brakes, Soft on Front – Your stopping distance will surely be better but not as good as it would be if you applied more pressure to the front (fear of lock-up seems to always be there).
2. Use Both Brakes, Soft On Rear – As above, your stopping distance will be shorter, even shorter than being soft on front brake, but still could be better by applying both with enough pressure to get the maximum stopping power from both.
3. Hard Front Brake Before Rear Brake- stopping distance will be close to #2 above but having braked hard with front, moves weight forward, less on rear tire, and when you apply the rear brake, there may be little it can do and it will lock-up, becoming useless because there is little weight there to give it downward force.
https://www.braaaaaapp.com/blogs/motorcycle-blog/should-i-use-front-and-rear-brake
Normally, you would apply a bit of braking to the front tire before you do the back tire to get the most effective way to stop (weight on front tire, downward force traction), but if you don’t feel comfortable with the pitch or downward movement of your bike in the front when coming to a stop, a trick to try when using both brakes is to slightly use your rear brake first, and then apply the front brake. This causes the bike to “squat” a bit, and the pitch in the front will not be as much. The stopping distance will be slightly longer but will be more controlled. In wet conditions, apply both at same time, together and gently.
When giving instructions to students, right from the beginning, I talk about “muscle memory” and how it affects our daily lives. It is that same muscle memory that needs to be instilled as a motorcycle rider, and, as an example, the new riders are instructed to mount and dismount the motorcycle with the side-stand down, even if the bike itself is light and easy to get on and off without the side-stand down. Rationale – chances are the bike they will ride on the road will be a great deal heavier and bigger than the course bike we supply, so get in the habit (muscle memory) of using the side-stand (I have seen too many people hurt by forgetting to use the side-stand and the bike fall on them).
So it goes that if you practice properly, your muscle memory can come to the rescue. Find a parking lot, and maybe a friend to work with, and practice your stopping techniques. Set up a starting point to accelerate from, and a stopping point where you apply the brakes. Use cut up tennis balls to mark your progression (that’s the job for your friend), and this will give you a good visual of how well you, and your particular bike, will stop.
Remember to always Ride Skilled - Ride Smart - Ride Safe
